10 Essential WordPress Code Snippets Every Site Owner Should Know (No Plugin Bloat)

If you've ever installed a plugin just to disable one small WordPress feature, you already know the cost: another database table, another settings page, another thing that can break on update, and a few extra milliseconds on every page load. Every snippet below does the same job as a dedicated plugin would — in 5-20 lines of code, with zero extra overhead.
All snippets are copy-paste ready. Each one tells you exactly where it goes, why you'd want it, and what to customize.
1. Disable XML-RPC Without a Plugin
Use case / benefit: xmlrpc.php is one of the most commonly abused endpoints on WordPress — it's used for brute-force login attempts, DDoS pingback amplification attacks, and comment spam. Unless you actively use the Jetpack mobile app or a legacy XML-RPC integration, there's no reason to leave it open.
Performance & security advantage: A security plugin capable of blocking XML-RPC attacks typically also scans your whole site, adds firewall rules, and logs every request — real overhead for a problem this filter solves in one line.
Where to paste: functions.php (your active theme, or better, a site-specific plugin)
// Disable XML-RPC entirely — no plugin needed.
add_filter( 'xmlrpc_enabled', '__return_false' );

// Also remove the X-Pingback header and the RSD discovery
// link from <head>, since both exist only to advertise XML-RPC.
add_filter( 'wp_headers', function ( $headers ) {
    unset( $headers['X-Pingback'] );
    return $headers;
} );
remove_action( 'wp_head', 'rsd_link' );
Step-by-step:
- Open
functions.phpin your active theme (or a site-specific "must-use" plugin, which survives theme changes). - Paste the snippet above at the end of the file.
- Visit
https://yoursite.com/xmlrpc.php— you should now see an error/blank response instead of the normal "XML-RPC server accepts POST requests only" message. - If you use Jetpack or the WordPress mobile app, do not use this snippet — they depend on XML-RPC.
2. Enable SVG File Uploads Safely
Use case / benefit: WordPress blocks .svg uploads by default because SVG is technically an XML file that can contain embedded JavaScript. For logo uploads, icon sets, and design work, this default is often more restrictive than most site owners need.
Performance & security advantage: This filter only allows the upload — it does not sanitize the file. That's the trade-off for avoiding a full "SVG support" plugin. Combine it with the security notes below rather than treating it as a complete solution.
Where to paste: functions.php
// 1. Allow .svg in the Media Library's accepted MIME types.
add_filter( 'upload_mimes', function ( $mimes ) {
    $mimes['svg'] = 'image/svg+xml';
    return $mimes;
} );

// 2. Fix WordPress's file-type sniffing so it recognizes valid
//    SVGs correctly (without this, some SVGs still get rejected
//    even after step 1).
add_filter( 'wp_check_filetype_and_ext', function ( $data, $file, $filename, $mimes ) {
    $filetype = wp_check_filetype( $filename, $mimes );
    if ( 'svg' === $filetype['ext'] ) {
        $data['ext']  = 'svg';
        $data['type'] = 'image/svg+xml';
    }
    return $data;
}, 10, 4 );
Security note: An SVG can carry a <script> tag exactly like an HTML file can. This snippet does not strip that out. For a production site where non-admin users can upload media, either:
- Restrict SVG upload capability to admins only (wrap the filters above in a current_user_can( 'manage_options' ) check), or
- Pair this with a proper sanitizing library (e.g. the enshrined/svg-sanitize Composer package, or the free "Safe SVG" plugin if you'd rather not maintain the sanitization code yourself).
Step-by-step:
- Paste the snippet in
functions.php. - Try uploading an
.svgfile through Media → Add New — it should now succeed. - If you have multiple content editors (not just admins), read the security note above before rolling this out site-wide.
3. Remove the WordPress Version Number for Security
Use case / benefit: By default, WordPress prints its version number in your page's <head> (via the generator meta tag) and in the query string of every CSS/JS file it loads. Automated vulnerability scanners use this to instantly know which known exploits apply to your site — removing it doesn't make you unhackable, but it does remove a piece of free reconnaissance.
Performance & security advantage: This is a "security through obscurity" measure, not a replacement for updates and a firewall — but it costs nothing and takes 30 seconds to add, so there's no reason to skip it.
Where to paste: functions.php
// Remove the WP version from <head> and RSS feeds.
remove_action( 'wp_head', 'wp_generator' );
add_filter( 'the_generator', '__return_empty_string' );

// Remove a few other identifying links from wp_head while we're here.
remove_action( 'wp_head', 'rsd_link' );
remove_action( 'wp_head', 'wlwmanifest_link' );
remove_action( 'wp_head', 'wp_shortlink_wp_head' );
remove_action( 'wp_head', 'adjacent_posts_rel_link_wp_head' );

// Strip the ?ver=X.X query string WordPress appends to
// enqueued scripts and styles, which also reveals the version.
add_filter( 'style_loader_src', 'dn_remove_version_query_arg', 9999 );
add_filter( 'script_loader_src', 'dn_remove_version_query_arg', 9999 );
function dn_remove_version_query_arg( $src ) {
    if ( strpos( $src, 'ver=' ) ) {
        $src = remove_query_arg( 'ver', $src );
    }
    return $src;
}
Step-by-step:
- Paste in
functions.php. - View your homepage's page source (Ctrl+U) and search for
generator— it should no longer appear. - Check that your CSS/JS
<link>/<script>tags no longer have?ver=6.xon the end.
4. Direct Checkout — Skip the WooCommerce Cart Page
Use case / benefit: For stores that mostly sell single items (digital products, one-off services, simple physical goods), the cart page is often just an extra click between "Add to Cart" and paying. Sending customers straight to checkout can measurably reduce drop-off.
Performance & security advantage: No plugin needed for what is fundamentally a one-filter change — installing a whole "one-click checkout" plugin for this is significant overkill for most stores.
Where to paste: functions.php
// Redirect straight to checkout after a normal (non-AJAX) add-to-cart.
add_filter( 'woocommerce_add_to_cart_redirect', function () {
    return wc_get_checkout_url();
} );

// Shop/archive pages usually use AJAX "Add to Cart" buttons, which
// don't reload the page — so the filter above never fires there.
// This small script catches that case and redirects manually.
add_action( 'wp_footer', function () {
    if ( ! is_shop() && ! is_product_category() && ! is_product_tag() ) {
        return;
    }
    ?>
    <script>
        (function () {
            jQuery(document.body).on('added_to_cart', function () {
                window.location.href = '<?php echo esc_js( wc_get_checkout_url() ); ?>';
            });
        })();
    </script>
    <?php
} );
Step-by-step:
- Paste both parts in
functions.php. - Test from a single product page (uses the PHP redirect) and from the shop grid (uses the AJAX script) — both should land on checkout.
- If you want some products to still use the normal cart flow (e.g. customers who buy multiple items together), skip this snippet in favor of a dedicated "Buy Now" button instead (see the WooCommerce category in our WordPress Snippet Generator for that variant).
5. Custom "Add to Cart" Button Text (By Category or Site-Wide)
Use case / benefit: "Add to Cart" doesn't fit every product. A pre-order item might need "Reserve Now," a service might need "Book This," a digital download might read better as "Get Instant Access." WooCommerce lets you override this text per product, per category, or globally with one filter — no separate plugin required.
Where to paste: functions.php
// Change the button text shown on shop/archive/category pages.
add_filter( 'woocommerce_product_add_to_cart_text', 'dn_custom_add_to_cart_text', 10, 2 );
// Change the button text shown on the single product page.
add_filter( 'woocommerce_product_single_add_to_cart_text', 'dn_custom_add_to_cart_text', 10, 2 );

function dn_custom_add_to_cart_text( $text, $product ) {
    // Category-specific override — change 'pre-order' to your
    // own category slug, and add more `elseif` blocks for others.
    if ( has_term( 'pre-order', 'product_cat', $product->get_id() ) ) {
        return __( 'Reserve Now', 'your-textdomain' );
    }
    if ( has_term( 'digital-downloads', 'product_cat', $product->get_id() ) ) {
        return __( 'Get Instant Access', 'your-textdomain' );
    }

    // Site-wide default override (applies to every other product).
    // Comment this line out if you only want the category
    // overrides above and the normal WooCommerce text otherwise.
    return __( 'Buy Now', 'your-textdomain' );
}
Step-by-step:
- Paste in
functions.php. - Replace
'pre-order'and'digital-downloads'with your actual category slugs (find these under Products → Categories). - Visit a product in each category to confirm the button text changed, and check a product with no matching category to see the site-wide default.
6. Disable Gutenberg and Restore the Classic Editor
Use case / benefit: Not every site benefits from the block editor — sites with a heavily custom admin workflow, or editors who are simply faster in the classic TinyMCE editor, often prefer to opt out. You can do this per post type instead of installing the full Classic Editor plugin.
Where to paste: functions.php
add_filter( 'use_block_editor_for_post_type', 'dn_disable_gutenberg_for_types', 10, 2 );
function dn_disable_gutenberg_for_types( $use_block_editor, $post_type ) {
    // List the post types that should use the Classic Editor.
    $classic_editor_post_types = [ 'post', 'page' ];

    if ( in_array( $post_type, $classic_editor_post_types, true ) ) {
        return false;
    }
    return $use_block_editor;
}

// To disable Gutenberg for EVERY post type instead, comment out
// the function above and use this single line instead:
// add_filter( 'use_block_editor_for_post_type', '__return_false' );
Step-by-step:
- Paste in
functions.php. - Edit the
$classic_editor_post_typesarray to match the post types you want on the classic editor. - Open an existing post of that type — it should load with the classic TinyMCE toolbar instead of the block editor.
7. Custom WordPress Dashboard Admin Footer Text
Use case / benefit: If you build sites for clients, replacing the default "Thank you for creating with WordPress" footer text with your agency's name (and a support link) is a small but professional touch — and a passive reminder of who built and maintains the site.
Where to paste: functions.php
add_filter( 'admin_footer_text', function () {
// Change the company name, year format, and link below.
return sprintf(
'Site built & maintained by <strong><a href="%s" target="_blank">YourCompanyName</a></strong> © %s',
esc_url( 'https://yourcompany.com' ),
date( 'Y' )
);
} );
Step-by-step:
- Paste in
functions.php. - Replace
YourCompanyNameand the URL with your own. - Refresh any wp-admin screen and check the bottom-left footer text.
8. Dynamic Copyright Year Shortcode — [current_year]
Use case / benefit: Hardcoding "© 2026" in a footer widget or page means updating it manually every January. A shortcode fixes this permanently — paste it once, and it's correct forever, even in a shortcode-enabled text widget (not just template files).
Where to paste: functions.php
add_shortcode( 'current_year', function () {
    return date( 'Y' );
} );

// Bonus: a version that also supports a copyright range,
// e.g. [current_year start="2020"] outputs "2020–2026".
add_shortcode( 'copyright_range', function ( $atts ) {
    $atts = shortcode_atts( [ 'start' => date( 'Y' ) ], $atts );
    $currentYear = date( 'Y' );
    return ( $atts['start'] == $currentYear )
        ? $currentYear
        : $atts['start'] . '–' . $currentYear;
} );
Step-by-step:
- Paste in
functions.php. - Use
[current_year]in any post, page, or shortcode-enabled widget/block. - For a copyright range like "2020–2026," use
[copyright_range start="2020"]instead.
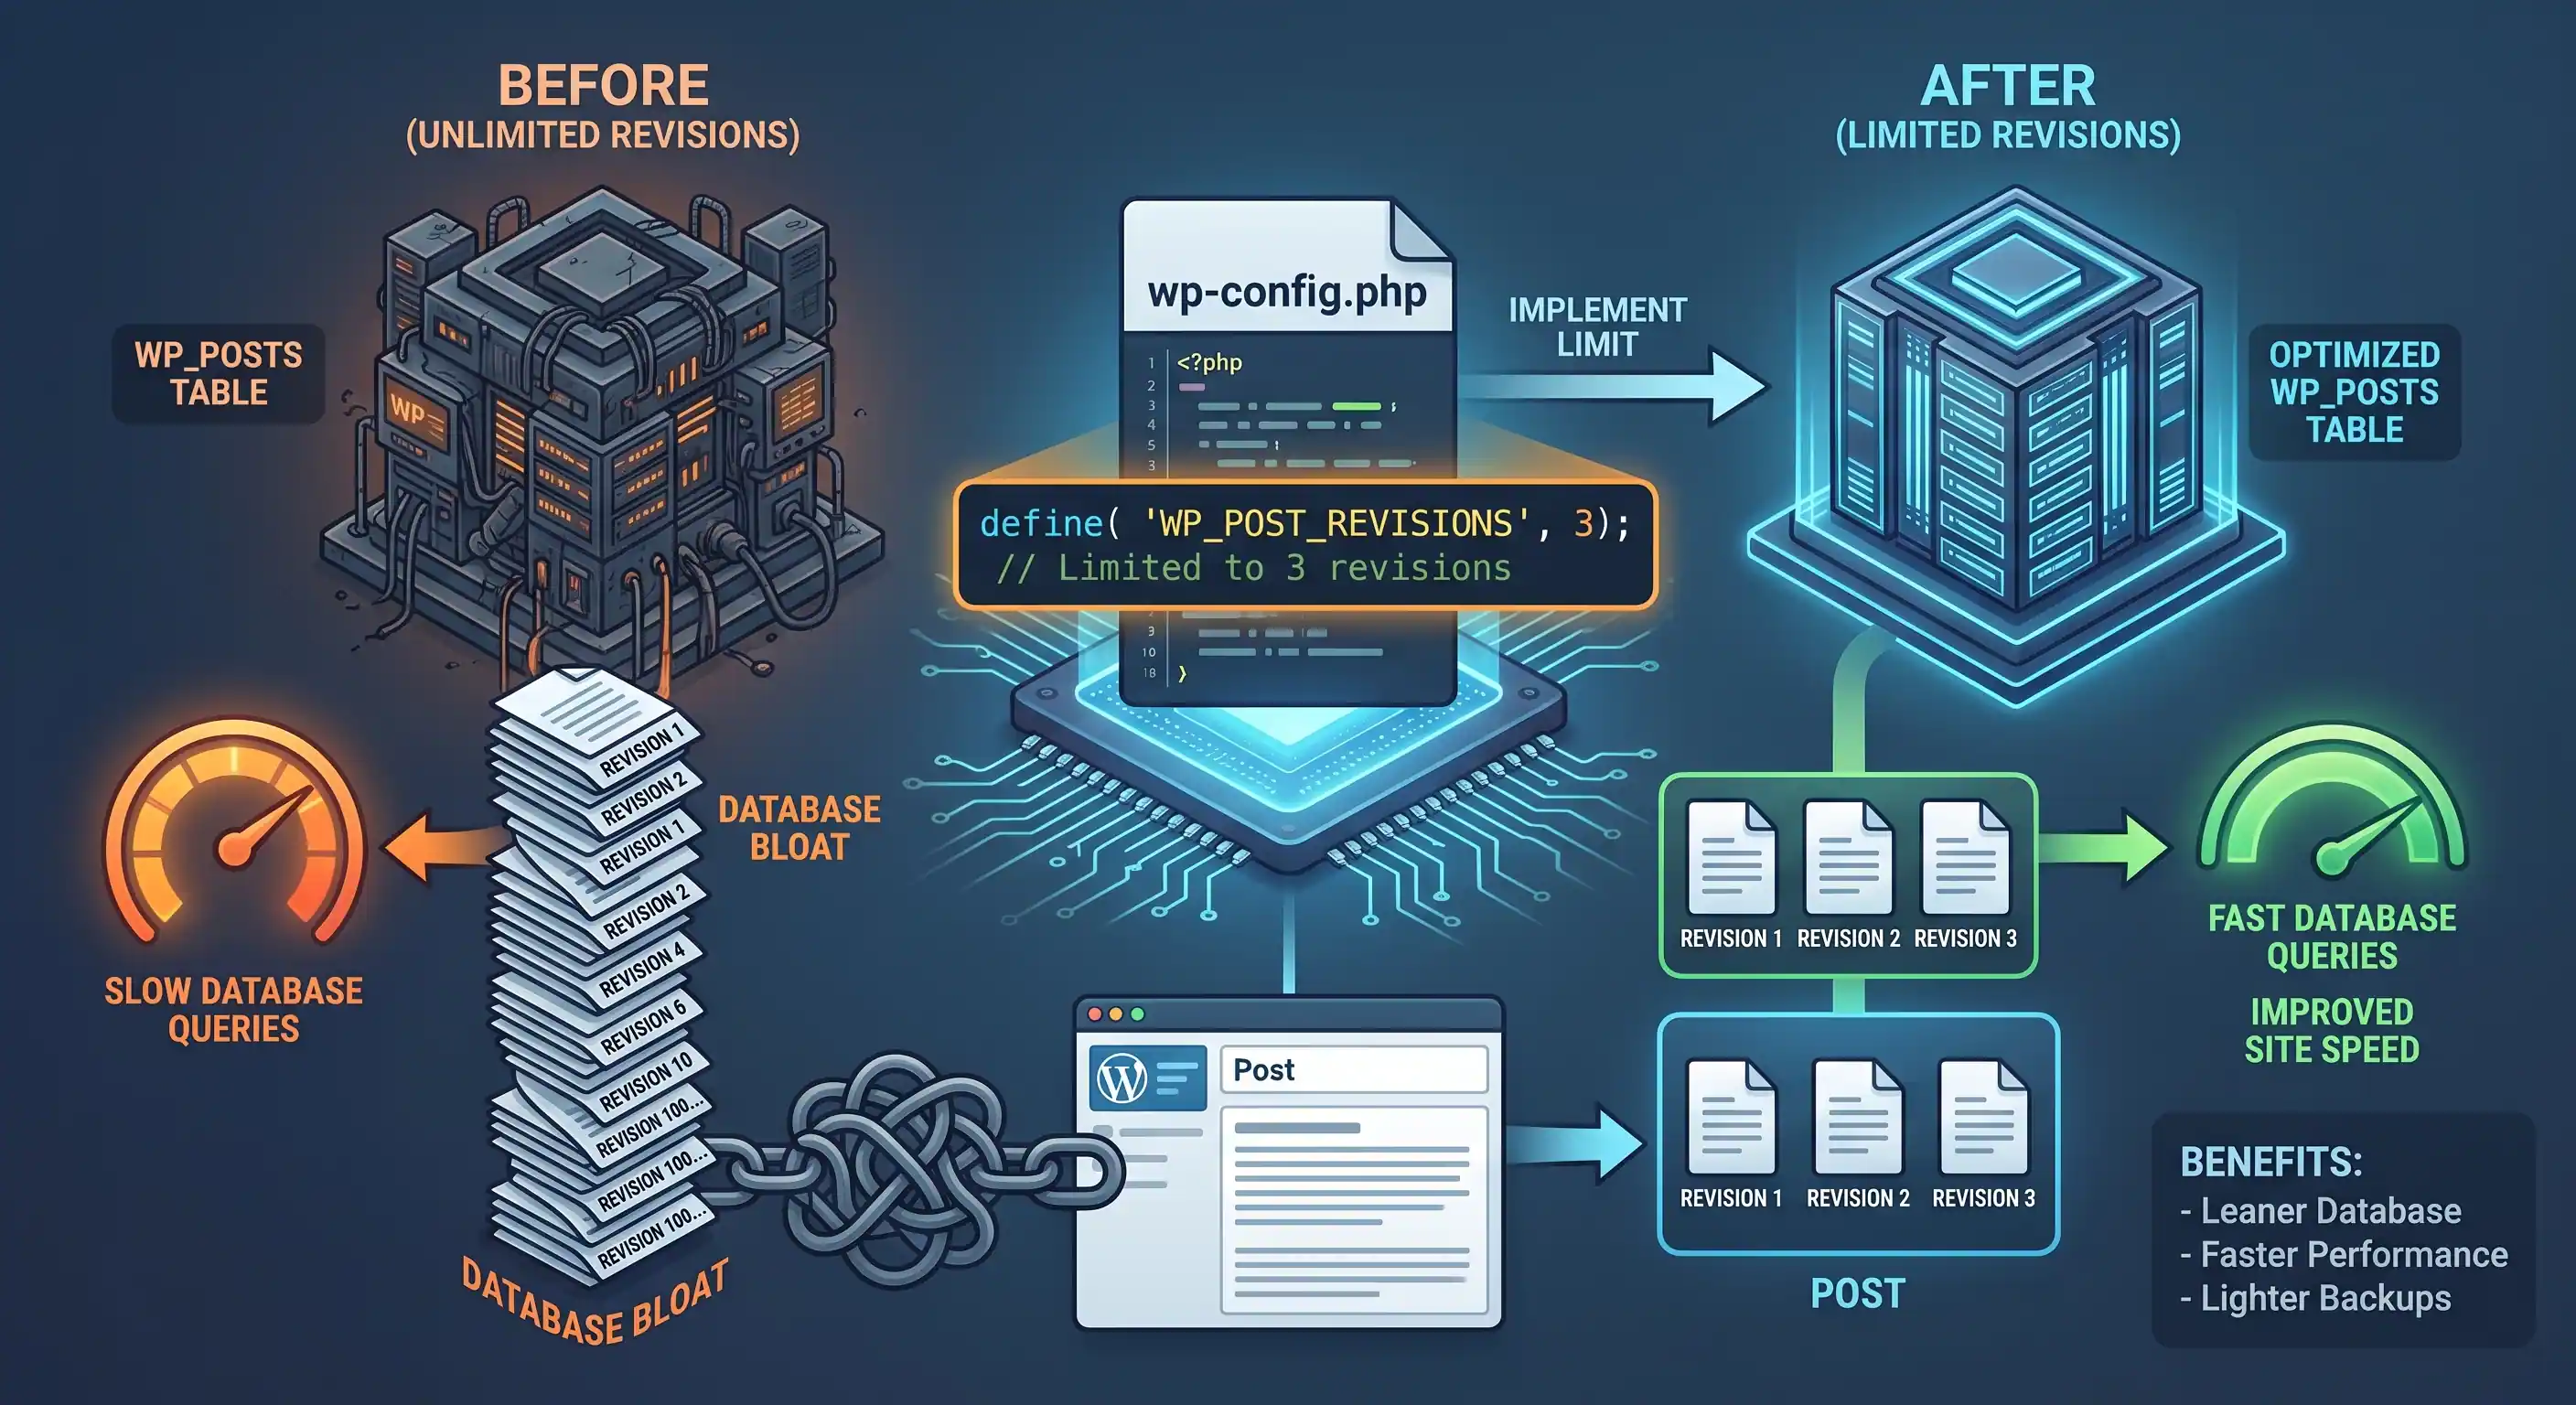
9. Limit Post Revisions to Prevent Database Bloat
Use case / benefit: By default, WordPress keeps every single autosave and revision of every post forever. On a site with years of frequently-edited content, the wp_posts table can end up mostly full of old revisions — slowing down backups and some database queries.
Where to paste: wp-config.php (simplest, site-wide) — add this above the /* That's all, stop editing! */ line:
// Keep only the 5 most recent revisions per post (site-wide).
define( 'WP_POST_REVISIONS', 5 );
Or, for more control (different limits per post type), use functions.php instead:
add_filter( 'wp_revisions_to_keep', function ( $num, $post ) {
    if ( 'page' === $post->post_type ) {
        return 3;
    }
    return 5; // default for posts and other post types
}, 10, 2 );
Cleaning up existing bloat: the constant/filter above only limits future revisions — it won't delete ones that already exist. To clear out old revisions right now, back up your database first, then run:
DELETE FROM wp_posts WHERE post_type = 'revision';
Step-by-step:
- Choose either the
wp-config.phpconstant (simpler) or thefunctions.phpfilter (more flexible). - If cleaning up existing bloat, take a full database backup first, then run the SQL above via phpMyAdmin.
- Check Tools → Site Health or your hosting's database size indicator before/after to confirm the reduction.
10. Duplicate / Clone a Post or Page With One Click
Use case / benefit: Recreating a similar page from scratch (same layout, different content) is tedious. A "Duplicate" link right in the Posts/Pages list — copying content, taxonomies, and custom fields into a new draft — saves real time without a dedicated plugin.
Where to paste: functions.php
// Handle the duplicate action.
add_action( 'admin_action_dn_duplicate_post', function () {
    if ( empty( $_GET['post'] ) || ! current_user_can( 'edit_posts' ) ) {
        wp_die( 'No post to duplicate has been supplied, or you do not have permission.' );
    }

    $post_id = absint( $_GET['post'] );
    check_admin_referer( 'dn_duplicate_post_' . $post_id );

    $post = get_post( $post_id );
    if ( ! $post ) {
        wp_die( 'Original post not found.' );
    }

    $new_id = wp_insert_post( [
        'post_title'   => $post->post_title . ' (Copy)',
        'post_content' => $post->post_content,
        'post_excerpt' => $post->post_excerpt,
        'post_status'  => 'draft',
        'post_type'    => $post->post_type,
        'post_author'  => get_current_user_id(),
    ] );

    if ( is_wp_error( $new_id ) || ! $new_id ) {
        wp_die( 'Could not create the duplicate.' );
    }

    // Copy taxonomy terms (categories, tags, custom taxonomies).
    foreach ( get_object_taxonomies( $post->post_type ) as $taxonomy ) {
        $terms = wp_get_object_terms( $post_id, $taxonomy, [ 'fields' => 'slugs' ] );
        wp_set_object_terms( $new_id, $terms, $taxonomy );
    }

    // Copy custom fields / post meta.
    foreach ( get_post_meta( $post_id ) as $key => $values ) {
        foreach ( $values as $value ) {
            add_post_meta( $new_id, $key, maybe_unserialize( $value ) );
        }
    }

    wp_safe_redirect( admin_url( 'post.php?action=edit&post=' . $new_id ) );
    exit;
} );

// Add the "Duplicate" link to the Posts list row actions.
add_filter( 'post_row_actions', 'dn_add_duplicate_link', 10, 2 );
// Add the same link to the Pages list.
add_filter( 'page_row_actions', 'dn_add_duplicate_link', 10, 2 );

function dn_add_duplicate_link( $actions, $post ) {
    if ( current_user_can( 'edit_posts' ) ) {
        $url = wp_nonce_url(
            admin_url( 'admin.php?action=dn_duplicate_post&post=' . $post->ID ),
            'dn_duplicate_post_' . $post->ID
        );
        $actions['dn_duplicate'] = '<a href="' . esc_url( $url ) . '">Duplicate</a>';
    }
    return $actions;
}
Step-by-step:
- Paste the full snippet in
functions.php. - Go to Posts (or Pages) in wp-admin — hover over any item and you'll see a new "Duplicate" link next to Edit/Trash.
- Click it — you'll be redirected straight into editing the new draft copy.
- Only users who can edit posts will see or be able to use the link (enforced by the
current_user_can()check).
A Note on Where These Snippets Live
Every snippet above goes in functions.php (or wp-config.php for #9's constant option) — never edit your theme's core files directly, and if you're not using a child theme, consider a small site-specific plugin instead of functions.php, so your snippets survive a theme change or update.
Want these as ready-to-copy cards with a live preview and a color customizer instead of scrolling through a blog post? All 10 (plus dozens more) are also available in the WordPress Snippet Generator under the WordPress PHP Functions & Hooks and WooCommerce Essential Snippets categories.

Comments & Feature Requests
0 Found a bug, or want a new tool? Let us know below.
comments_no_comments